Life Drawing Classes are back on! yay! Here’s the one piece worth posting from this weeks class.

Life Drawing Classes are back on! yay! Here’s the one piece worth posting from this weeks class.
Creating Drag/Droppable UI in Maya is a really nice way of making your UIs either more user-friendly or adding a lot more functionality without adding any more visible UI controls. It is also very easy to set up and manage once you know how.
Nearly all UI controls (of all types; buttons, sliders, fields, layouts, etc..) support being a drag zone, drop zone or both. If you add a drag callback flag to your UI control it will be dragable, if you add a drop callback it will be a drop zone. Add both callbacks and your UI control can be dragged and dropped to!
To make a piece of UI drag or droppable you simply add the appropriate flag and it’s function to the control command. For example:
button -l "Create Cube" -c "polyCube" -dgc "dragButton" -dpc "dropButton";
This creates a normal button that, when pressed creates a cube. When MMB-dragged, the button will execute the function dragButton and if anything is dropped onto the button, the function dropButton will be executed.
Every UI control uses these same two flags to support drag/drop (-dgc and -dpc) and when their functions are executed Maya automatically passes certain parameters into them.
Of course we have to write these callback functions, and every callback you write must always contain the same correct input parameters:
// the drag function:
proc string[] dragProc(string $dragCtrl,int $x, int $y, int $mods)
{ ... }
// and the drop function:
proc dropProc(string $dragCtrl, string $dropCtrl, string $msgs[], int $x, int $y, int $typ)
{ ... }
Don’t worry about what all those params do just yet, we’ll get to that later, for now lets just create some test UI:
{
string $win = "dragDropTestWindow";
if (`window -exists $win`)	deleteUI -window $win;
window -title "Drag/Drop Window" $win;
columnLayout -adj 1 -rs 5;
button -h 50 -l "Drag Me!" -dgc "dragCallBack";
button -h 50 -l "Drop Here!" -dpc "dropCallBack";
button -h 50 -l "Drag/Drop Here!" -dgc "dragCallBack" -dpc "dropCallBack";
separator -h 20;
button -h 50 -l "MMB-Click me!" -dgc "dragCallBack" -dpc "dropCallBack";
setParent ..;
window -e -wh 200 300 $win;
showWindow $win;
}
Now if you run that MEL script it should display a test window with four large buttons. Of course they won’t work yet as we’ve not defined our callback functions, but lets do that now…
global proc string[] dragCallBack(string $dragCtrl,int $x, int $y, int $mods)
{
	print ("dragCallBack - Drag control: "+$dragCtrl+"\n");
	return {"A","B","C"};
}
This is the DRAG callback. You can call it anything you like but it must have four input parameters (but again, as long as they are a string and three ints, you can call them whatever you like). This callback function is fired as soon as you MMB-drag on any UI control with it specified in its -dgc flag. The drag callback function MUST return a string array otherwise it will NOT register the drag/drop functionality at all!. If you’ve ever tried to get drag/drop working and been unsuccessful, chances are this was the reason!
Even if you don’t want your drag callback to return any data or messages it still has to return a string array, although returning an empty array is fine if you really don’t want any actual data.
The primary input parameter is: $dragCtrl. When the callback is executed this parameter contains the (full) name of the UI control you dragged on. To be honest I’ve never really needed this data as you also get it inside the drop callback, but it’s here anyway if you do need it for something. The $x and $y params pass in the screen x and y positions you clicked on and $mods holds any keyModifier values, so if you want to check the user is holding down SHIFT or CTRL or whatever you can. (see Maya’s getModifiers command for more details on modifiers).
You may find that in your production UI you have several different drop callbacks, but you can often recycle the same drag callback for all the UI controls. In all my UIs so far the drag callback does practically nothing, it simply exists to ensure that the dropping works, as you cannot have one without the other!
global proc dropCallBack(string $dragCtrl, string $dropCtrl, string $msgs[],
			int $x, int $y, int $type)
{
	string $text = "dropCallBack:\n";
	$text += ("    Drag control: "+$dragCtrl+"\n");
	$text += ("    Drop control: "+$dropCtrl+"\n");
	$text += ("    messages: ");
	$text += `stringArrayToString $msgs ", "`;
	confirmDialog -m $text;
}
This is the DROP callback and it’s the important one that does all the work. Basically, dragging something usually has no effect in itself right? it’s only once you let go and drop it that something happens! As with the drag function, you may call this anything you like, but make sure your function always has these same six parameters.
The first two are strings which contain the (full) names of the drag control and the drop control. These are important because you will always want to know what you dragged and what you dropped it on to determine what action to take. The third parameter is the message array. This simply contains whatever the drag callback returned. While this is often unused it is a way to pass your own data from the drag to the drop zone if you need to. The $x and $y parameters are the screen position of the drop and $type is supposed to somehow indicate move, copy and link, but I’ve never found any details of how to utilise this parameter. I’ve never needed to use any of these three last parameters and chances are you won’t either, but don’t forget they still have to be declared as function parameters.
Once you’ve input the UI code above and defined both drag and drop callbacks you should have a fully working Drag/Drop UI to play with.
You can legally drag/drop controls from any drag/drop UI to any other drag/drop UI, even between different windows and even when they have different callback functions. The only way to restrict what is permitted to be dropped on what is by making your drop callbacks check some attribute or property of the drag control and return if not “compatible”.
Unfortunately you cannot interact with the existing drag/drop controls inside Maya. For example you cannot drop a shelf button or a hypershade swatch onto a custom UI drop zone or drop your custom drag objects onto a maya drop zone (i.e. viewport, outliner, hypershade, etc..)
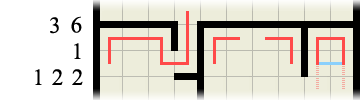
Labyrinth is a new puzzle I recently discovered that takes the logic of Picross/Hanjie and adds a new dimension. Here’s a very simple 6×6 sample:

Each labyrinth puzzle consists of an empty board with a series of numbers along the left and top edges and a Start(S) and End(E) point marked (as seen above). The goal is to fill in a complete labyrinth of walls, tracing a continuous path from Start to End, visiting every square on the board grid once and once only.
As mentioned before, solutions are derived using the same logic rules as Picross (trad. known as Hanjie) so if you’ve played either of those games before, labyrinth should be very easy to pick up.
Walls and path may only be drawn horizontally and vertically, the walls are drawn along the grid lines and the path is drawn from square to square (center to center).
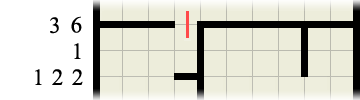
The numbers given along each edge denote how many wall sections there are on that grid line, and how long each section is. For example:

means that along this particular horizontal grid line there are four separate sections of wall. The first wall is 2 grid units long, followed by a wall a single unit long, followed by a wall 3 grid units long and finally another wall 1 unit long. There must be at least one segment gap between each section of wall and the sections are always drawn in the order shown (i.e. 2 first (leftmost), then 1, followed by the 3, and finally (rightmost) a 1). Because the grid in this example line is only 10 units wide, there is only one possible solution:

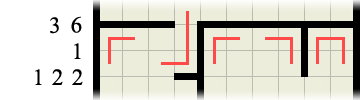
and once we know where there is no wall we can mark the path in:

However, you will not always immediately know where all the wall segments go, for example the following line is not so conclusive:

Still, no matter where the 6-length wall actually is on this line we can be sure that the two central spaces must be occupied by it, so we can mark those in right away:

the remaining four sections of this wall will have to be deduced later by some other method but, for arguments sake, lets assume that sometime later on we are able to add a path line here:

we can now safely deduce that the first two squares must also be paths (otherwise we’d have TWO wall sections, one of 2 and one of unknown length, and our edge numbers for this line clearly show there is only a single wall of length 6). It is obvious now that the wall has to start from at least the fourth grid section, so we know it must run up to at least the ninth, as it’s 6 long. We’re only 1 square off completing this line now:

As you can see this is typical Picross/Hanjie logic.
Once we have one full section of wall in we can draw some of the path in. For example if we somehow end up with this:

It will immediately give us:

and then, because we can see that the only other wall on this row is on the right of the 4 wall we know that there can’t be another wall in the first square, so it must also contain a path:

the 1-long wall must be in one of the remaining 3 grid spaces.
We can see that drawing the walls helps us to determine the path, and drawing the path helps us to determine where the walls are.
Common Tips:
The path always starts from S and terminates at E and must visit every square on the grid once and only once. This is a key factor in solving every labyrinth puzzle as in certain common situations it helps dictate where a wall or path can or cannot be. For example, in any labyrinth there cannot be any T-junctions, crossroads or dead-ends (except S and E which have to be dead-ends!), therefore, in any situation where adding a wall would cause a dead-end you know it must be a pathway.
Corners – One situation where this crops up the most is in corners. Wherever and whenever you find an inside corner you can always draw the path straight away (unless it has a S or E in it!). Take the following scenario for example:
Without even bothering to check or consider where any other walls or path may be we can immediately fill in the paths inside each and every corner as so:
This then immediately provides us with another wall clue:
which in turn gives us another corner to fill the path in at…
Finally, if you consider the right-hand portion of the labyrinth in the above image, we can deduce that the path CANNOT run horizontally (highlighted in blue) as this would produce an invalid path loop. Therefore there must be a wall there, which in turn means the path must run downwards (highlighted in faint pink)
0 (zero) walls – If the wall sections number is 0, meaning there are no wall segments along this line you can immediately draw paths between every set of squares along this grid line:

This is also true whenever you have filled in all the given wall segments on a line:

means you can fill in the rest like so:

S and E side by side – If the S and E are ever alongside one another you can immediately draw a wall between the two as so:

Vertical grid lines follow exactly the same principles as all the examples above, except vertically! 😉
There should only ever be one possible unique solution per puzzle and no guessing is required.
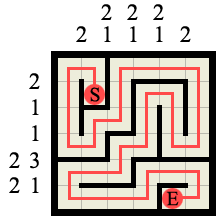
Here’s a sample solution (to the example 6×6 labyrinth shown at the start). Notice how the path is a single continuous line from S to E and it visits every square on the board without splitting or crossing itself.
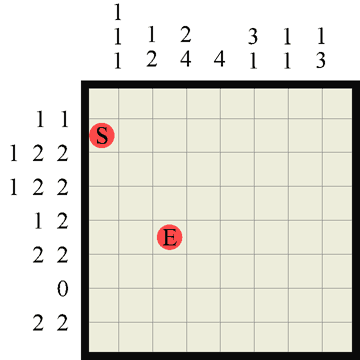
Finally, here’s a couple of easy 8×8 puzzle to try (dump them into photoshop or print them out)

I’ll be adding more puzzles frequently, and shortly a Maya python script to play them dynamically in 3D!!
Have Fun!
I avoided writing anything model-related in python for ages because I thought it didn’t have a native vector data type like MEL does. It doesn’t as it happens, but OpenMaya comes with one that is really simple to use and understand called: MVector.
Ryan Trowbridge has already gone over the basics of this on his blog, but I thought I’d cover it in a bit more detail, especially with some real-world examples.
The first thing you have to do is import the MVector class from the OpenMaya module:
from maya.OpenMaya import MVector
Once this is done you can start creating vectors like so:
X = MVector(1.0, 0.2, 0.3)
Y = MVector(0, 1, 0)
The MVector simply takes 3 floats which represent the x, y and z components of the vector. You can’t, unfortunately, print out the MVector values by refering directly to it:
print X
<maya.OpenMaya.MVector; proxy of <Swig Object of type 'MVector *' at 0x18b95ad0> >
but you can refer to the individual components:
print X.x
# 1.0
print X.y
# 0.2
print X.z
# 0.3
print X.x, X.y, X.z    # in one line
# 1.0 0.2 0.3
mc.setAttr('pCube1.tx', X.x)    # use as you would ordinary float variables
You can also do cool and useful stuff with the vectors very easily:
mag = X.length()    # gets the vector magnitude(length)
print mag
# 1.06301458127
X = X.normal()    # normalises the Vector

Z = X^Y    # the ^ character is a shortcut for the CrossProduct function
d = X*Y    # the * returns the dotProduct if both items are vectors
Yb = Y*5.0    # but if one item is a single number it simply multiplies the vector
print Yb.x,Yb.y,Yb.z
# 0.0 5.0 0.0
If you want to capture command output into an MVector it’s just as easy as with MEL, you just have to add one minor addition, the * character:
V = MVector(*mc.pointPosition('pCube1.vtx[0]'))
The * character, in front of a list in python is kind of like shorthand for “unpack”. Because MVector expects 3 individual floats (doubles actually, but that’s splitting hairs!) you cannot legally pass it a list, even if the list is 3 elements long. The * tells the list to “unpack” itself into it’s constituent elements, so the MVector accepts it. This also holds true for anywhere in python where you need to pass a list in as individual params.
There’s a lot more you can do with MVectors, but I hope this basic stuff is enough to help you replicate what you can do with vectors in MEL. If you want to check out the more complex MVector methods and uses have a look in the Maya API – MVector docs
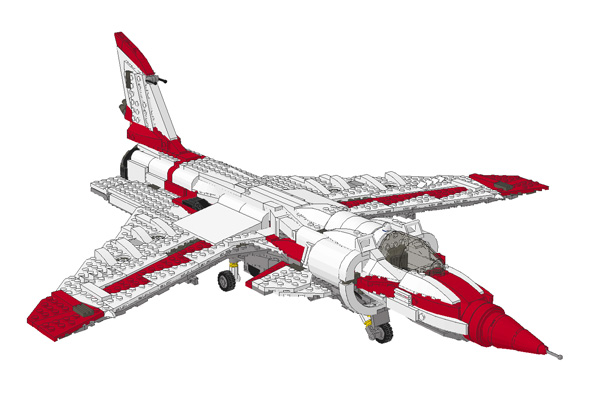
I’ve completed a LEGO-CAD build of the X-29 Fighter I made a couple months back. Here’s a couple of shots of it, one from inside MLCad and the other from inside LDView. There’s no step-by-step instructions (WAY too many pieces!) but I’ve constructed the model in step-by-step sequence so if you do wanna check it out or build a version of your own you can pretty easily.
You can download the .MPD here and from the LEGO Instructions pages link on the right.

Seeing as how this is supposed to be (partially at least) a MEL and Python code blog I thought it only proper that I set up some kind of code syntax highlighting.
However, if I’d known what utter hell it was going to be I may have reconsidered. It’s taken me basically the whole day to get this much working and that’s only due to the help of a WordPress/PHP savvy mate (cheers John).
The first thing I tried was Code-Snippet, which seems pretty good and allowed me to easily write and impliment a new MEL syntax file. But I couldn’t get the colours to change from the defaults, it used the wrong kind of quotes (not good for MEL/py code!) and I couldn’t get word-wrapping to turn off either..! so I ditched that and tried SuperHighlighter Evolved.
SuperHighlighter Evolved seemed great but I couldn’t make that work like the site said it would either. Additionally, creating a new colour theme or Syntax file required a degree in scripting this kind of crap as well as a full understanding of WordPress’s underlying PHP gobbledegook. Goodbye SuperHighlighter Evolved…
Finally I plumped for Syntax Highlighter and Code Prettifier (by Vijesh Mehta) which seems to almost work so far.. once I’ve hacked around with the settings a bit! 😛
like so:
MEL Script :
// this proc returns the id number(s) of the scriptjob(s) using the given command (if existing)
// this can be used not only to simply query the scriptjob Id so you can edit or kill it, but
// also as a true/false exists check as it returns false if the scriptjob is not found.
global proc int[] getScriptJobID(string $command)
{
	string $sjs[] = `scriptJob -lj`;	// list ALL jobs
	int $jobs[] = {};
	for ($sj in $sjs)
	{	// loop through each job description looking for our command string
		if (`gmatch $sj ("*"+$command+"*")`)
		{
			string $token[];
			tokenize $sj ":" $token;
			$jobs[size($jobs)] = $token[0];
		}
	}
	return $jobs;
}
Python Script:
def typecastString(inputStr):
	"""Given an input STRING this returns it cast into the correct type;
	int, float, or string depending on what it contains."""

	inputStr = str(inputStr)	# just in case the input is not a string

	output = inputStr

	if inputStr.isdigit():
		output = int(inputStr)
	elif inputStr.replace('.','',1).isdigit():
		output = float(inputStr)

	return output
We had some pretty severe snow during the night and when we got up the following morning we heard that both my sons schools were closed for the day and there were no trains running from Manchester to Liverpool. So we all stayed home for the day and built a Snowman! Here he is.

Our life drawing classes still haven’t resumed so I’ve decided to keep practicing by trying to draw from photos while I wait. I don’t much care for Lily Allen to be honest but I have to admit she can look kinda cute.

This one took about 70 minutes all told and I had the shittest set of coloured pencils I’ve ever found lying around. they were so poor they wouldn’t draw over existing pencil marks unless I scrubbed and scrubbed. The black pencil was about as dark as a normal HB pencil so I had to find a black wax crayon to scribble in the hair and a black magic marker to fill in the eyes. I’ve also had to massively adjust the levels in photoshop so you can even see the pencils! 😀 Still, I think it is recognizable as her, so I’m happy enough with the end result.
Here’s the latest LEGO model I’ve been working on for the last 3-4 days (thank God for bank holiday weekends! 🙂 ) It’s based on the old X-29 Experimental fighter plane designed by NASA, instantly recognisable by it’s forward swept wings. Quite early on in it’s production my model became a more heavy, space-age variation on the X-29, rather than a faithful representation, and I think it looks all the better for that.

If you head on over to My BrickShelf Gallery there’s a ton of different shots of it to gaze upon in awe… :p


Powered by WordPress