This post is a step-by-step tutorial which will show you how to solve an example 6×6 Labyrinth puzzle with an explanation of each and every step. This tutorial covers most of the basic ideas behind solving Labyrinths but assumes you already have a basic understanding of both Labyrinth rules and Hanjie/Picross logic (which is the basis of labyrinth logic).
If you don’t already know the general rules of Labyrinth, or anything about solving one, please take a look at my general guide to solving labyrinths before going through this tutorial.
You can find an explanation of Hanjie/Picross logic here.
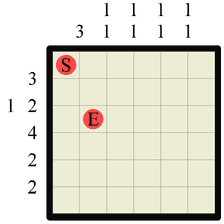 |
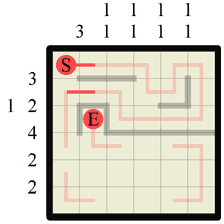
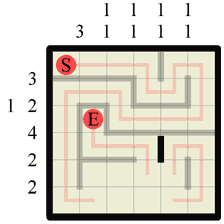
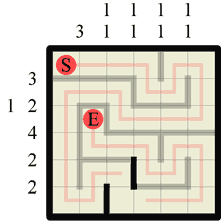
This is the Labyrinth puzzle we will be solving. At each step we will be filling in some walls or path (or both!) and any previous steps will be faded out slightly to better highlight the current step. Always draw your walls from grid intersection to grid intersection and your path from square center to square center, and always try to draw walls and paths in a different colour if possible, as this makes it far easier to see what is going on and what you are doing. |
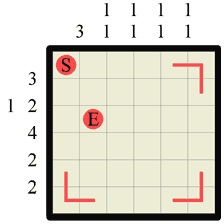 |
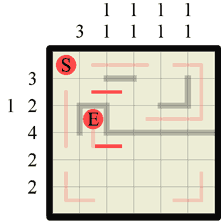
Step 1 The first thing you should always do is to fill in the corners. Any time that the labyrinth walls form a concave corner (and this of course is also true for the ‘outer’ walls) you should immediately fill in the path as a corner. The only exception to this rule is when the corner contains the Start or End markers, as these obviously denote a dead-end. In this step we draw three path corners and leave the top-left corner alone as it contains the (S)tart. |
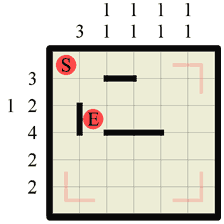 |
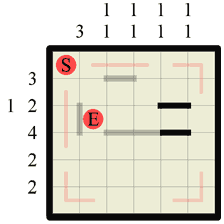
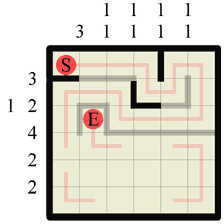
Step 2 The immediate next step should be to look at all the numbers and fill in any walls using standard Hanjie logic. In this step we can draw one section along the top row, as there is a wall of length 3, so wherever it is on the row that section must be a part of it. Notice how we could only make this assumption because we’ve already knocked out the last section on this row (when we marked it as a path in step 1). The third row has a wall of length 4, so we know that the middle two sections must be wall (standard Hanjie logic!). Finally the first column also has a wall of length 3 so we can insert 1 section of wall there too. |
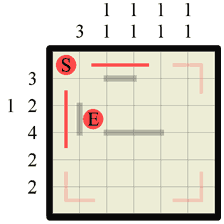 |
Step 3 Every time you create a ‘corridor’ between two walls you can draw in the path down it. ‘Corridors’ are created whenever a wall exists on both parallel sides of a square. In the previous step we created two short corridors so now we draw the path in. Remember that we always draw the path from square center to square center. |
 |
Step 4 Now we have drawn those paths in we have effectively shortened the possible wall area on the second and third grid rows. For this reason we can go back and apply the standard Hanjie logic again and two more wall sections present themselves. |
 |
Step 5 Ooh look! Filling those two bits of wall in last step created another corridor so immediately we draw the path in along it. |
 |
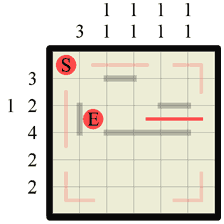
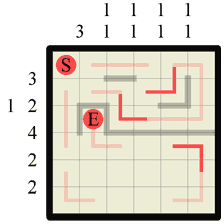
Step 6 Now we have to go back to some more Hanjie logic. If we look down the last column, denoted 1 1 we can see that the path we just drew splits the column area in two. We know that we need to have 2 separate walls both of length 1. There isn’t enough room in the bottom half to fit both of them with a gap so one of them has to exist in the single gap left at the top above the path split. We can therefore draw this in. |
 |
Step 7 The previous step again created a small section of corridor so we can draw some more path in. Two previously separate sections of path are now joined. |
 |
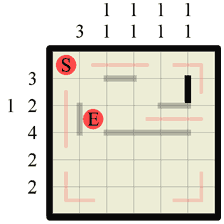
Step 8 Our path cannot form any kinds of junction so this step we can close off another section of wall where our path made a corner. In the same way that path corners can be drawn in when walls form a concave corner, so too can walls be drawn in around path corners. |
 |
Step 9 Now checking back at the row numbers, we can see that the last section of wall we drew in the previous step completes the wall of length 4 for this grid row. Consequently we can fill in any remaining gaps on this grid row with vertical paths which, as it turns out, is only one but it happens to connect to the (E). |
 |
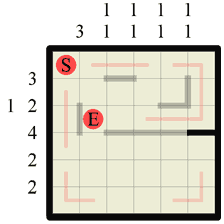
Step 10 We know that the (S) and (E) marker squares have to be dead-ends so, as we’ve already discovered the path exit point for (E), we can draw in walls around all the other edges of it. |
 |
Step 11 Looking at the column where we drew one of the previous walls in (denoted 1 1) we can see that it contains two wall sections, both 1 length. Well we just drew a wall of length one in that column, so we can mark off either end of that vertical wall with a path. We could have also done the same to the right of the second, horizontal wall section we previously drew too, but one thing at a time! 😉 |
 |
Step 12 After all that solving we’ve ended up with several more concave wall corners again. We can draw these in without further ado. |
 |
Step 13 In this step we can easily determine where a new path section should join up two existing path sections. This is because there was no other direction for either path end to go, other than where we filled in. No section of path can simply stop in a dead-end, go back on itself or create a junction, so this is the only possible outcome. |
 |
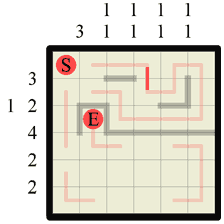
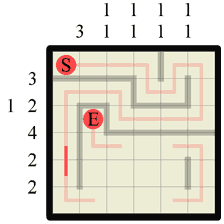
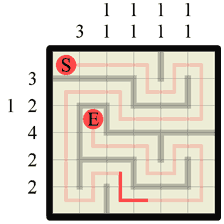
Step 14 This is not an actual step, but an example of an invalid move to consider. We know that a path connection here is impossible as it creates a closed loop, which is not allowed. Knowing where a path or wall cannot be is often just as important for progressing and solving a labyrinth as any other technique. If there cannot be a path across this section it MUST therefore be a wall (and vice-versa). |
 |
Step 15 Therefore we can draw in a wall here. As it happens we could have simply deduced that there was a wall here due to the fact that a wall of length 3 belongs on this row and it has to go here, but this is not always the case so it’s important to remember this subtle idea. |
 |
Step 16 Again with the ‘corridors’. We can draw in two sections of path where we just created two corridors. |
 |
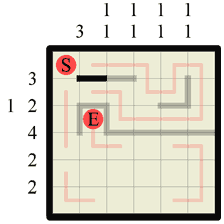
Step 17 Now we have a complete path in the upper half of the grid it only leaves us to fill in the missing walls. They can and must go in only one possible formation, so we don’t have to work anything else out to fit them all in. |
 |
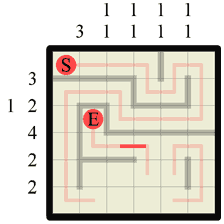
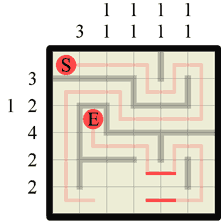
Step 18 Returning again to our standard Hanjie logic we can see two more columns where we can fill in our required wall lengths. In the bottom left goes our wall of length 3, and in the bottom right our second section of wall length 1. |
 |
Step 19 Fill in the path along this newly created ‘corridor’. |
 |
Step 20 Earlier, in step 11, we inadvertantly exposed a corner in the path. Now we can draw a wall around this corner (we could of course have done this at step 11 too if we’d wished!) |
 |
Step 21 Drawing in the section of wall in the previous step showed us where the only wall section on this grid row must start. This means we can now fill in the neighbouring section to complete our wall of length 2. This also means there is no more wall on this grid row so we can additionally fill in vertical paths in any remaining gaps. |
 |
Step 22 Yet another corridor created that we can path through. |
 |
Step 2 Two more path corners have appeared, this time side by side, so we can draw in a dividing wall. |
 |
Step 24 This last wall completes all the wall sections for this grid column, which means we can now fill in path sections across all the remaining gaps. |
 |
Step 25 Another concave wall corner means another path corner can be drawn in. |
 |
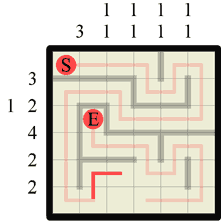
Step 26 Approacing the last few steps is usually a formal matter of filling in the obvious walls and paths, and this puzzle is no exception. We know the wall of length 2 must go here as the existing path dictates that is has to. |
 |
Step 27 Two more wall sections can be filled in. In this case either by looking at the numbers to see where wall sections are missing or by simply blocking off the corners the path has made. |
 |
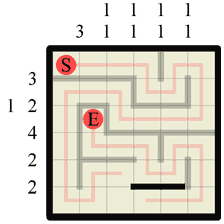
Step 28 The last step is simply a case of filling in the last section of corridor that has appeared, which here makes a nice corner. |
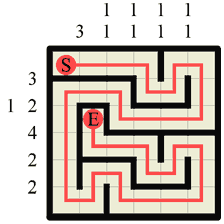 |
Step 29 Here is the finished Labyrinth puzzle. Notice how, in direct contrast to Hanjie, probably more than 50% of the puzzle was actually solved without any reference to the numbers, but rather by logical deduction about where the path or walls must be based on the single fundamental principle that the path must travel from (S)tart to (E)nd visiting every square in the grid without junctions, overlaps or dead-ends. |


